How to make a
very cool and cheap (not counting time) walking desk / treadmill desk....
While I had heard of a ‘Walking
Desk’ / ‘Treadmill Desk’ before, as well as a ‘Standing Desk’
such as the one by "Geek-Desk"
(a 'standing desk' was not too appealing to me,
but one thing I've figured out is that if I want it to be just a 'standing
desk', I just turn the 'treadmill off'.),
the catalyst for getting off my chair and actually
acquiring one was while listening to the
’Clark
Howard Show’ on the radio and he stated that he had ordered a
Treadmill desk for himself. That added a bit more ‘credence’ to the
idea of getting one myself.
As most of my business is conducted
via my web site, my job requires a lot of ‘desk time’ for writing /
research, and I was convinced that amount of time spent sitting was ‘killing
me’. I was very anxious to address that, and was convinced a ‘walking
treadmill’ was the answer.
I already have an
‘Expresso
Fitness’ exercise bike in my office. For those of you who aren’t
aware of what these are, I’ll just tell you that they are an INCREDIBLE
device. Yes, they are ‘relatively speaking’, very expensive, but in my
opinion worth it if you can’t get out on a bike or it’s not typically
practical for you to get exercise otherwise. It’s a ‘spinning bike’ with a
computer generated, ‘ride simulator’ built-in. It has a ‘graphics computer’
(mine is an ‘XP’ machine) with a ‘magnetic brake’ to simulate hills /
different terrain (no friction bands or mechanical devices to heat up or
wear out) and a monitor to display, what I consider great graphics of about
a 50 different rides / tours. I love spending time on it, but that’s the
problem. I have to have ‘dedicated time’ off my computer and away from my
desk (thus not working) to ride it. While I try and spend 20 minutes to an
hour a day on it, it doesn’t always work out that way, so that’s where the
‘treadmill desk’ will come in (frankly I couldn’t imagine a ‘Standing Only’
desk. That idea did not appeal to me at all. Anyway, if I want a ‘Standing
Only’ desk, I can just turn the treadmill ‘Off’).
Being the ‘DIY’ guy that I am,
purchasing an already made treadmill desk was not really an option as they
seemed to be ranging in price from $1500 to $2500. I will
preface that with saying however, that I spent an inordinate amount
of time coming up with the various designs
(mostly in my head, but also thru trial and error), making trips to
the hardware store and the actual construction of it that I probably could
have purchased one for the ‘time’ I spent on it. The issue is, however, that
it wouldn’t have been as ‘compact’ and for my office space, as practical.
I knew I would get a treadmill used,
either on craigslist or from a thrift store, as I see them at auctions,
garage sales, Goodwill’s, Salvation Army thrift stores etc, all the time.
Right away there were issues, as I
knew there would be from doing a bit of ‘web research’. One issue was how
well the treadmill does at really slow speed’s such as a ‘half mile an
hour’. A couple I tried did not do well, as they made a ‘groaning’ noise at
that slow speed, and / or had a ‘buzz’ / vibration that transferred to the
deck, which you could feel in your feet.
The other issue was whether to
incorporate the desk into the ‘side rails’ / console of the treadmill. The
general consensus on the web was NOT to do that, as any movement created
from walking, jogging or running, on the treadmill would be transferred to
the ‘desk’. Thus my initial mental designs utilized a ‘detached’ desk. I
struggled with how to do the desk. One web site showed a guy that simply
made one from a shelving unit (one of those ‘welded wire’ types), which
seemed to function pretty well, but still needed a ‘solid shelf’ or desk
surface to be practical and / or comfortable. Then I thought of a ‘keyboard’
stand, like the type keyboard players would use on stage or in a studio (I
had sold countless designs of these over the years, being in the retail /
music business). I already had an ‘A-Frame’ version by
‘Ultimate
Support’, but also looked at a few keyboard stands from
'Quik-Loc’
as I had sold those as well, but kept coming back to incorporating what ever
‘console support’ / side rails that might be built-into the treadmill as it
would be more compact, and frankly ‘simpler’ to design and construct my desk
around. I also did not believe that at a ‘walking speed’ (which is what I
would really be doing with it, as I can’t think that ‘jogging or running’
will be very practical while trying to work, but we’ll see) would transfer
much in the way of vibration to the work surface or monitor.
After a handful of trips to
various thrift stores and an auction or two, I
came up with the candidate. It was a ‘Vitamaster’ for $10. I tried it out at
the store prior to deciding on it (not because I was worried about ‘blowing’
ten dollars, but didn’t want to ‘go through the hoops’ of loading it,
hauling it to work, unloading it, and then having to return it, or dispose
of it if it wasn’t a good candidate from the start). Some of the prior one’s
I had looked at had ‘deal breaker’ issues such as; too noisy (I wear a
‘Bluetooth’ headset and they pick-up most any ambient noises), or they
either didn’t have an ‘incline’ feature, or the ‘incline motor’ / mechanism
was bad, had noisy / worn
belt rollers, had a ‘buzz / vibration’ at slow speeds, didn’t do well
going at ‘slow speeds’, ‘dead’ console LCD / LED screens, memory battery
compartment corrosion, worn out walking belt, were UGLY, etc. Heck, the one
I settled on was missing the ‘side rails’ and had the broken ‘stub’ of the
safety key duct taped in so it would still run, but I thought
it was still the best candidate I had seen for a couple weeks, and the fact
that it was only ‘ten buck’s’ was 'icing on the
cake'.
After a few trips to the hardware
stores / Home Depot / Lowes, purchasing PVC pipe to try and make my
‘A-Frame’ keyboard stand taller, and looking at shelving units as
alternatives, I decided to ‘scrap’ the separate desk / stand and incorporate
my desk into the support already built into the treadmill. I also was ‘on
the fence’ about how to mount the monitor to either one. I also wanted the
monitor to be a bit more ‘portable’ / moveable than it would be if attached
to the desk. I also was a bit more concerned about vibration getting
transferred to the monitor, both from a ‘visual’ aspect as well as from a
‘longevity / health’ aspect for the monitor (electronics commonly don’t like
excessive vibration). Now there’s a potentially ‘terminal’ issue with doing
that and that is once you’ve done that, you are very ‘married’ to that
treadmill, as the desk won’t likely be ‘interchangeable’, especially once
you go so far as to incorporate the ‘console’ attributes as I ended up
doing. Besides most of my time had been spent fretting over the previous
designs utilizing keyboard stands / shelving units. Once I came up with a
‘mental’ design, I was very excited about how it would turn-out.
The treadmills ‘console’ that
sported all the LCD ‘status’ screens / readouts, speed controls, ‘On/Off’
switch, ‘Incline’ switch and safety key were unfortunately exactly where I
wanted my keyboard / mouse desk, so I would have to ‘re-engineer’ all of
that. My desk was simply a ‘pre-made’ shelf from Home Depot that I had
already lying around the shop (unfortunately with lots of
holes drilled into it's edge, so not the 'prettiest', but I'm going to add a
'padded edge' soon so it will be hidden). It’s simply one of those ‘pre-finished /
particle board’ shelves that are laminated in white vinyl. Heck, it was
already cut to a fine length from some previous use. I envisioned
segregating and incorporating the different aspects of the original console
into the desk at positions that were practical for the new use.
After studying the internal workings
of the console / switch location / wiring, I decided to simply ‘cut’ it up
into smaller sections. It was made of a fairly pliable / soft plastic that I
could tell would not shatter when cut with snips (not scissors, but ‘tin
snips’ designed for cutting sheet metal / ducting. We have many at our shop
for various uses). I could have used a jig saw / saber saw, but the snips
and a couple of razor blades to make ‘score lines’ worked great. Some cut’s
I simply scored with a razor blade, then broke along the score lines. I
cleaned up the jagged cut lines with a belt sander and / or files. I wanted
to maintain the essential layout of the speed control, status screens and
other switches as well as the safety key, that the original design featured
as that work had already been sussed by the manufacturer. Once the original
console was ‘cut-up’ I ended up with 4 pieces. The ‘speed’ control section,
the LCD screen section, the ‘On/Off’ switch / ‘Incline’ switch’ and the
‘safety key’ port / switch. I wanted to utilize the original plastic panel
as much as possible, as it already had the silk-screened labeling. For the
‘Speed’ control and the ‘switches’ I simply used a router and recessed the
shelf about 1/8 to 3/16” deep for the plastic section, and cut access for
the back of the switches with a jig saw (I could have skipped the router
step, but wanted it to be recessed from a cosmetics standpoint, and needed a
good excuse to use my router. Unfortunately, being in a hurry, I
‘free-handed’ the router part, so the recessed edges aren’t very straight.)
The console already had the lower section of plastic molded at the perfect
angle, so I simply screwed it to the back edge of the shelf. There was
enough extra length of wire stuffed down inside the lower part of the
treadmill, to reach the slightly more extended portions of the shelf, so I
didn’t have to ‘scab’ in any wire. I may have to when I properly fit the
safety switch. I did mount the shelf with twin hinges on the back to allow
for easy access to the back / bottom side. As the original console
sub-structure was angled, I simply used three ‘stove-bolts’ to level the
front (see photos) (I affixed 3 rubber pads under the shelf for them to rest
on).
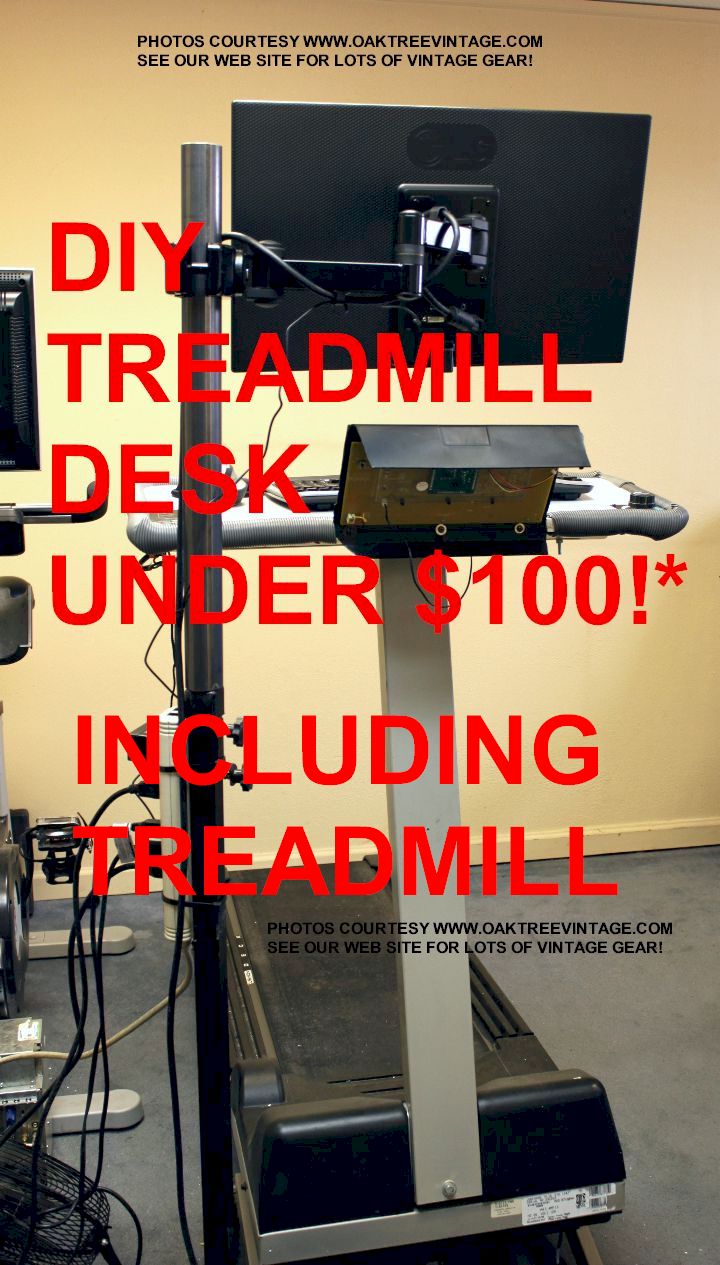
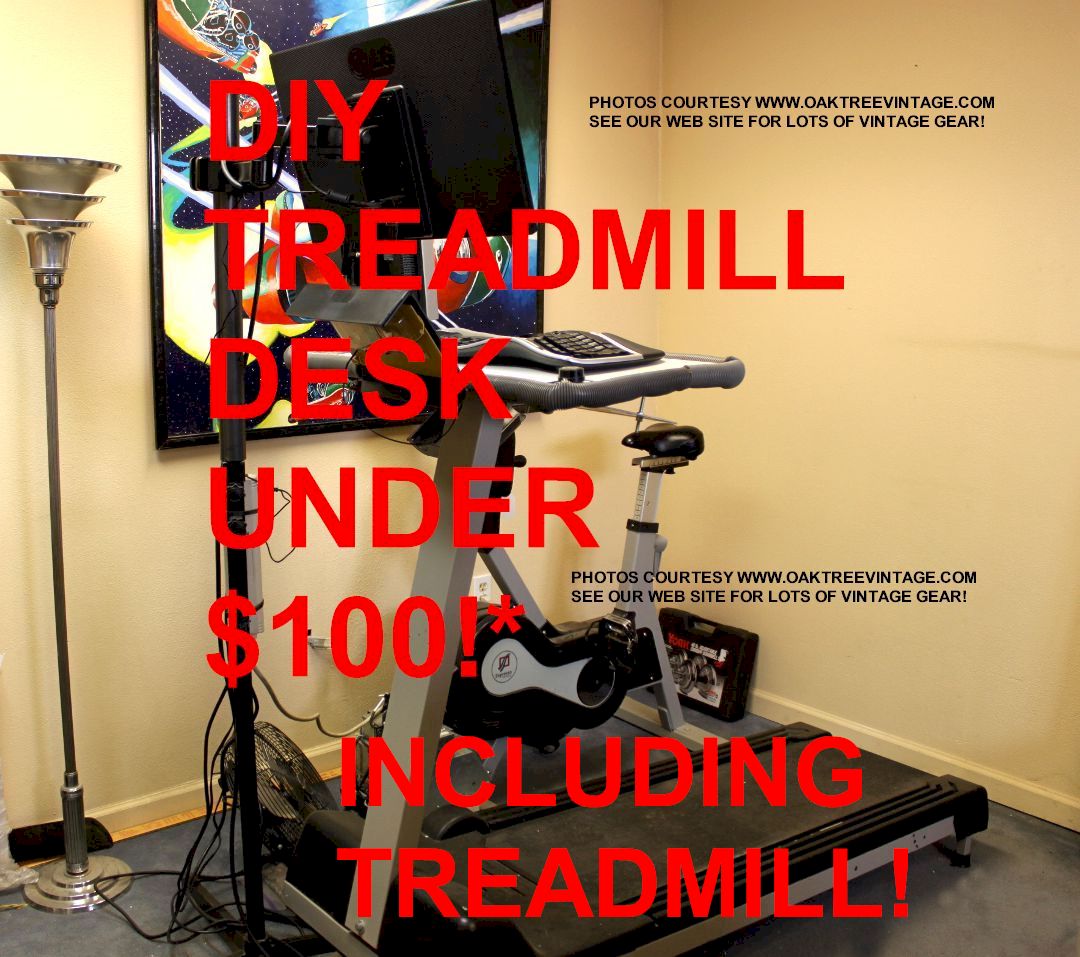

(click thumbnail to enlarge photo)
The monitor I had decided to mount
on a stand separately. I looked at a couple of ‘pre-made’ stands that I was
thinking of going with, then realized I already had an old speaker stand for
stage use, I thought might work. I then realized I had access to monitor /
flat panel
LCD TV
mounts designed for
mounting a flat panel LCD television / flat panel computer monitor to a
vertical stand. My stand was an ‘odd one’ in that it was made of ‘square
tubing’ (I had some newer speaker stands by 'Ultimate
Support’, but was already using them to hold up speakers, and their
‘foot-print’ was not as small as this existing ‘square-tubing’ stand I had,
which would have also been an issue in my ‘limited’ office space). Once I
got the flat panel 'pole mount’ apparatus
in, I realized it really was designed for ‘round’ poles, so after a few
trips to Home Depot, Lowes, ACE Hardware, etc, to find the correct ‘pipe’
either in PVC, galvanized or whatever would ‘just fit’ over the top of the
stand, I ended up going to a ‘metal supply’ and getting a section of 1/8”
wall, 1.75” ID steel stock. For my purposes it fit perfectly. Slid right
over the square section of the stand and the computer monitor bracket /
mount had the perfect ‘profile’ for the round pipe. The only current issue
is that the mount I got does not ‘extend’ out from the stand and again, due
to floor space, the stand is ‘off to my right’. I have another version
coming that extends out, allowing the monitor to be directly in front of me.
(click thumbnail to enlarge photo)
List of materials / cost
(while the
*'cheap'
price did include the treadmill, it did not include the EXTRA monitor, keyboard, mouse and cable I
purchased so I could still retain my normal desk, and I already had the
stand to mount the monitor on)
Used treadmill; $10.
Used 17"
monitor from Goodwill; $15.
Shelf; ~$5.
(actually already had)
Monitor
bracket; $45.
Pipe Stock from
local metal supply house; $6.
Vertical
monitor stand; (already had
one from my PA system speakers)
Misc hardware; ~$6.
______________________________
Total ~ $87.00
Secondary Add-on's, over and above the original "under $100."
price tag;
New, larger monitor (Now purchased a 23" LG 24EN43 23" LED monitor
{~$170-$210. at the time of this writing}. {Had to 'upgrade' the 17" monitor
as since I had a 23" HP monitor already on my desk, but I had to 'dumb' it
down as the monitor for the treadmill desk was only a 17", and your image
can only be as good as your 'least size' monitor. I still don't really get
why, but that was how it was, and many people that were 'in the know'
confirmed that, so now I have 23" monitors on both desks. More below on that**...})
Used Wireless keyboard / mouse; $65.
Gray / Flexible tubing around desk edge; ~$10. from Home Depot
HDMI cable to connect previous /
existing computer monitor: $25. Office Depot
25 foot VG cable $45.
Time: A LOT of that
= $$$$
(mostly coming up with the design I liked. A second one would be a fairly
small fraction of the original time)
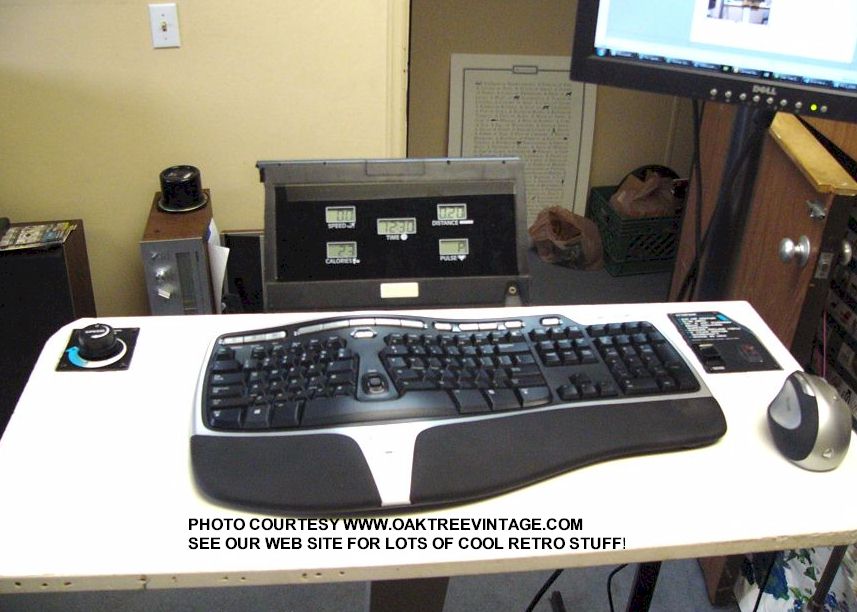
'Speed Control' is in upper left corner of desk-top. Original treadmill
console (width cut down) screwed to center back edge. 'Power Incline' and
'On-Off' in upper right corner.
Safety key switch fastened under right corner of desk top.
Bottom line is I LOVE IT!!!
There are a couple of issues
remaining. I had gotten pretty used to my 23” wide-screen, HP monitor, and
the ‘extra’ monitor from the thrift store is only 17”. I tried to adjust
each independently, but was unable to get the ‘wide’ monitor to have it’s
original attributes. One computer tech said both monitors would have to
display as the ‘least’ monitor. Another said that I should be able to adjust
both independently and get my ‘wide screen’ monitor adjusted for ‘wide
screen’ attributes. I plan simply acquiring another ‘wide screen’ monitor
for the treadmill soon. The other issue is that since I have two
mouse’seses’s / mice / meese’ses’s (oh...whatever...)
they each are assigned the same attributes / parameters but they both
exhibit different speeds. I’ll have to look into that further, get both mice
to be the same, or just ‘get used to it’.
I realize the treadmill I based this
around is a typical ‘consumer’ level treadmill, and for the trouble it is to
build a treadmill desk, I probably should have started with a ‘commercial
grade’ or ‘professional’ level treadmill as it would likely last many times
longer, run cooler and have a softer, better feeling deck, but this is a
good one to ‘get my feet wet’ with.
I do have to say, that now that I've
finished it, I have since seen a 'ready to go' treadmill desk by a company
called
"Work-Fit Treadmill" / workfittreadmill that appears to be a good
potential unit and figuring the time and materials to create mine, would be
about 'break-even'. Just FYI.
**So, as stated earlier, I have since 'upgraded'
the monitor on the treadmill desk to a 23". Also, as I already stated, I am
using a 'pole mount' for the monitor. To my amazement (disbelief /
disappointment) most monitors that I was seeing at Office Max, Staples, Best
Buy, and Office Depot do not have the 'standard 4-bolt pattern' on the back
for mounting. Obviously manufacturers were cued that the majority of
consumers didn't need that, but I was surprised. I found a few that were
over the $200 mark, but I also wanted HDMI and DVI as well as standard VGA
connections. The only one I could find locally available for immediate
purchase was the LG 24EN43 23" LED monitor (which as proven to be a fine
monitor). One thing I noticed is that all the 'new' monitors (including the
LG 24EN4) have gotten very 'thin' which was no doubt a 'facilitated
bi-product' if you will, of removing the substructure that allows a monitor
to be mounted alternatively via the standard 4 bolts on the back panel. Even
this LG 23" flat panel monitor that I purchased, while it does have the
mounting plate area, was very 'flimsy' as when I placed it on it's face, and
'stood' the pole mount on the monitors back (to bolt it into place) the back
flexed a considerable amount. I will be very careful when adjusting the
vertical angle of the monitor by simply 'grabbing the edges' and not keeping
the mounting arm adjusted 'too tight' as it could likely cause problems with
the monitor down the road.
I've recently (and finally) added a 'border' around the treadmill desktop,
which does a couple of things (makes it look better is not one of them). It
keeps my mouse and coffee cup from 'flying off' (the mouse had done that
many times), and it's makes it less painful when I bump into it while
walking by (rounding the corners also helped with that). I simply utilized
some 'split / flexible tubing' fastened with some short 'sheet rock' screws
from underneath.
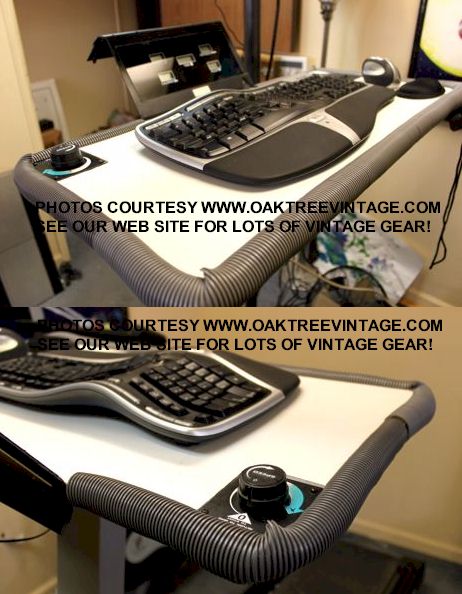
I also finally attached the 'safety key / switch' (not that I use it mind
you).


